

This box will pop up. You want to enter in 648px by 300px and 100dpi. You can make the background white or transparent. It's up to you. I am using transparent. Click OK.

Your screen should now look like this.


Once you have selected a picture, you will want to commit the image. Make sure you commit first, or your image will end up looking distorted.

Now click on the border around the picture and move it so that it's covering up the header box. Once it's covering the box it should look like this.... Now we will add a picture to our header. Go to file-->open. Browse for a picture you want to include in your header. Double click on the photo and the picture will open in PSE.
  Your screen will now look like this. At the bottom you will see where I have highlighted the header picture. Go down and double click on the header to bring it back up in the screen.
 Once you bring the header back into view, you will now need to drag/drop the picture onto the header. *I am doing the picture this way instead of "placing" it so that when we go to resize the picture to fit it in the header, it won't become distorted. Basically so the picture won't stretch and you can still see it clearly.
SO, drag/drop the picture onto the header.
Once you bring the header back into view, you will now need to drag/drop the picture onto the header. *I am doing the picture this way instead of "placing" it so that when we go to resize the picture to fit it in the header, it won't become distorted. Basically so the picture won't stretch and you can still see it clearly.
SO, drag/drop the picture onto the header.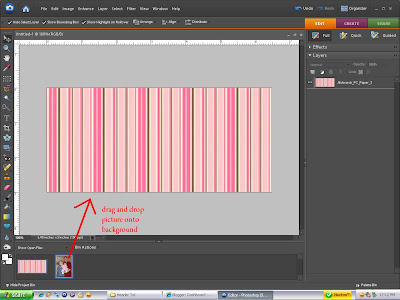

Now we are going to add a frame! Go to file-->place just like in step 4 above. Browse for the frame you want to use. Make sure you commit the image again.
 Now arrange the frame so it goes around the picture. Then commit by clicking the green check mark.
 Now we'll add some text! Go over to the toolbar on the left. Click the little "T" Now place the cursor to where you want your text to go. Don't worry, you can always change the place when you are done.
 Type your words. If you want to change the size go up to the toolbar on top like in the picture below.
 To change the color of the font, go down to the bottom where you see two little boxes on top of one another (color pallette). Click on the box on top and a new window pops up. From there you can change the color to whatever you choose. * To move your words around, highlight like you see in the picture below then take your cursor and move it a little bit away from the words. You will see your cursor turn into two little arrows. Once this happens you can drag/drop your wording to where you want!

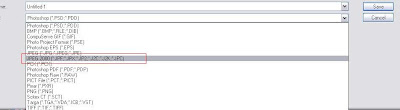
OK! Now you have made your header!! Congratulations! Next we need to save the file. Go to file-->save as.

 A box will pop up and just click OK.
 You have now created a header! Now that you have the basics, you can play around and try to make something different! If you have any questions, please leave them in the comments section! Good luck!


No comments:
Post a Comment