Saturday, October 25, 2008
Thanksgiving Treat!
So, I was browsing through some scrapbooking items when I noticed that there wern't any cute turkeys! I started out only doing the turkey but then one thing led to another and here is this little mini embellishment kit! I hope you like it! It's my very first attempt at making scrapbooking items. If you make any LO's using it please send it my way!! I would love to see them!


Jack O' Lantern!


Hey everyone! Ginger has an awesome new kit out and the best part is IT'S FREE!!!! Click on the pictures to be taken to her blog to download. She also has some news on her blog so you definitely want to check it out! You can also see some LO's the creative team have done. It's perfect for Halloween and carving pumpkins! So hop on over to her blog!!
Friday, October 24, 2008
Simple Header Tutorial
It has come to my attention that many of you reading this blog would like to know how to make your own header for your blogs. It is really very simple. I will explain how to make a simple header using a picture and frame in this tutorial. Are you ready? OK! Let's get to it!
*Note: I am using digital scrapbooking backgrounds and elements. You can find free ones through GingerScraps. She also has a tutorial on her blog on how to download and extract the files. With these kits, you can do so much more than the presets that photoshop has.
OK, first, I'm going to be using Photoshop Elements 6.0. Open PSE and go to file-->new-->blank file....

This box will pop up. You want to enter in 648px by 300px and 100dpi. You can make the background white or transparent. It's up to you. I am using transparent. Click OK.

Your screen should now look like this.

Now we are going to put a background to it. Go to file-->place. Browse for the picture or background image you want.

Once you have selected a picture, you will want to commit the image. Make sure you commit first, or your image will end up looking distorted.

Now click on the border around the picture and move it so that it's covering up the header box. Once it's covering the box it should look like this.... Now we will add a picture to our header. Go to file-->open. Browse for a picture you want to include in your header. Double click on the photo and the picture will open in PSE.
  Your screen will now look like this. At the bottom you will see where I have highlighted the header picture. Go down and double click on the header to bring it back up in the screen.
 Once you bring the header back into view, you will now need to drag/drop the picture onto the header. *I am doing the picture this way instead of "placing" it so that when we go to resize the picture to fit it in the header, it won't become distorted. Basically so the picture won't stretch and you can still see it clearly.
SO, drag/drop the picture onto the header.
Once you bring the header back into view, you will now need to drag/drop the picture onto the header. *I am doing the picture this way instead of "placing" it so that when we go to resize the picture to fit it in the header, it won't become distorted. Basically so the picture won't stretch and you can still see it clearly.
SO, drag/drop the picture onto the header.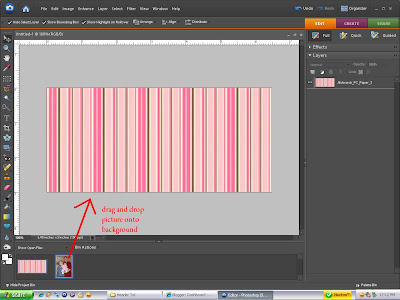
Now your header will look like this. Place the picture to wherever you want it. I'm putting mine on the left hand side.

Now we are going to add a frame! Go to file-->place just like in step 4 above. Browse for the frame you want to use. Make sure you commit the image again.
 Now arrange the frame so it goes around the picture. Then commit by clicking the green check mark.
 Now we'll add some text! Go over to the toolbar on the left. Click the little "T" Now place the cursor to where you want your text to go. Don't worry, you can always change the place when you are done.
 Type your words. If you want to change the size go up to the toolbar on top like in the picture below.
 To change the color of the font, go down to the bottom where you see two little boxes on top of one another (color pallette). Click on the box on top and a new window pops up. From there you can change the color to whatever you choose. * To move your words around, highlight like you see in the picture below then take your cursor and move it a little bit away from the words. You will see your cursor turn into two little arrows. Once this happens you can drag/drop your wording to where you want!

OK! Now you have made your header!! Congratulations! Next we need to save the file. Go to file-->save as.

Make sure to save the picture as JPEG.
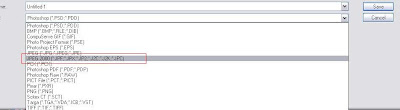 A box will pop up and just click OK.
 You have now created a header! Now that you have the basics, you can play around and try to make something different! If you have any questions, please leave them in the comments section! Good luck!
Wednesday, October 15, 2008
Mums
My neighbor (whom I never met) came to my house one day in sort of a panic. Her 2 year old daughter had locked her out of the house and she had no way of getting back in. I have been in this predicament many times before. After the first time I went out immediately and got a bunch of house keys made and hid them in various places around the house. And they are so well hidden, that I don't even know if I could find them now! Anyway, I let her use my phone and asked if she needed anything other than to use my phone. She said no and went back to her house to check on her daughter. She ended up breaking a window to get into her house. It worked out because they were in the process of putting new ones in anyway. So she broke out an old one and her hubby replaced it. In the end it all worked out.


Later on that evening she and her girls stopped by my house to say thank you. She brought me a beautiful flower pot of mums, and a little book and fruit snacks for Kylie. I couldn't resist taking pictures of them because they were beautiful!! So here are some of my amateur photographs


Friday, October 10, 2008
Focus, focus, focus
Here lately I've been trying to work with my camera in finding different focus points. It's so hard to do with a point and shoot. And basically the camera I have is a point and shoot on steroids. It's a nice camera for sure, but very difficult for me to figure out how to get the focus just right. I have to say that I like the way these turned out. I love how the bush is in focus and the trees in the background aren't. Then there is the one with my daughter. It would have been a great shot had I turned her around or shot it at a different angle. Anyway, I am still trying to figure this thing out. It will take some time I'm sure.


:) Laura


Wednesday, October 8, 2008
Ladie's Night
I made this LO using GingerScraps kit "Ladie's Night". It's so adorable and I just love how this turned out!
.jpg)
.jpg)
Saturday, October 4, 2008
"fake" photo creases

One of my fellow CT members made a LO using Fancy Fall by Gingerscraps. I was very intrigued by her photo. It was sepia tinted with a very unique look. She explained it briefly to me and after playing around with it, I finally figured it out! I love the way this turned out. Basically, I used the magic wand on a paper background I found in a digi scrpabooking kit I have to select all the spots I wanted to delete. I deleted it, then inversed the image. After doing so, it picked up the tiny creases that I wanted. I then dragged it onto the photo. I tinted the layer to the color I wanted. Basically what I did, was take the creases of the paper only and layered it over top of the photo.
Wednesday, October 1, 2008
Black and White Edits
First of all, I am NO expert at editing photos, nor do I pretend to be. I do this for fun and I am sharing it with all of you as a guideline. Nothing I write here is set in stone. Some of these edits will not work for others. Play around with the levels, try different things.... who knows, I could probably learn a lot from you! Now, on to the edits:
Sometimes even in the best photos, the lighting can be a little off. Take these pictures for instance. They are stunning in and of themself, but even the greatest photographers will agree that a little edit here and there make for more bold, beautiful photos! All I did for these pictures was bump up the sharpness a little. I used unsharp mask: amount 44%, radius 1.5, threshold 1. It didn't change it drastically, but it definitely improved it a little.
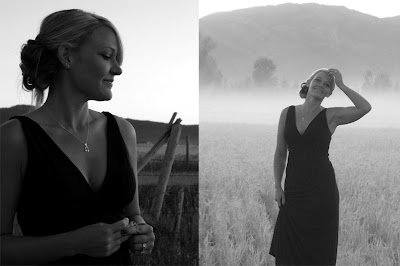 On to the next step.... I just created a new layer in the layer palette, then I added a little contrast around the edges. I used gaussian blur to soften the edges and then I decreased the opacity to about 38%.
After that was finished, I just have to lighten up the face a bit. I created a new layer of the picture. On the new layer, I used "lighting effects". It was really bright and it needed to be softened a bit! I changed the opacity of that layer to around 78%. Now, all you have to do is flatten the image and voila! You now have a brighter, and more favorable picture!
On to the next step.... I just created a new layer in the layer palette, then I added a little contrast around the edges. I used gaussian blur to soften the edges and then I decreased the opacity to about 38%.
After that was finished, I just have to lighten up the face a bit. I created a new layer of the picture. On the new layer, I used "lighting effects". It was really bright and it needed to be softened a bit! I changed the opacity of that layer to around 78%. Now, all you have to do is flatten the image and voila! You now have a brighter, and more favorable picture!
Notice how you can see her face a lot better? The burned edges adds a beautiful contrast to her face!

I love this picture! So pretty! Her face is so pretty and I wanted to enhance that. I brought the face into the light so you could see it a little better.

Subscribe to:
Posts (Atom)