
First of all, I am NO expert at editing photos, nor do I pretend to be. I do this for fun and I am sharing it with all of you as a guideline. Nothing I write here is set in stone. Some of these edits will not work for others. Play around with the levels, try different things.... who knows, I could probably learn a lot from you! Now, on to the edits:
Sometimes even in the best photos, the lighting can be a little off. Take these pictures for instance. They are stunning in and of themself, but even the greatest photographers will agree that a little edit here and there make for more bold, beautiful photos! All I did for these pictures was bump up the sharpness a little. I used unsharp mask: amount 44%, radius 1.5, threshold 1. It didn't change it drastically, but it definitely improved it a little.
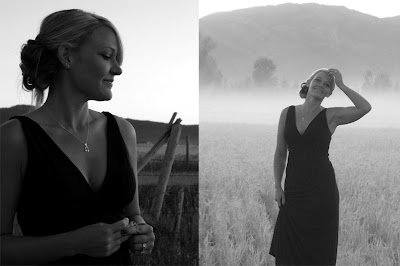 On to the next step.... I just created a new layer in the layer palette, then I added a little contrast around the edges. I used gaussian blur to soften the edges and then I decreased the opacity to about 38%.
After that was finished, I just have to lighten up the face a bit. I created a new layer of the picture. On the new layer, I used "lighting effects". It was really bright and it needed to be softened a bit! I changed the opacity of that layer to around 78%. Now, all you have to do is flatten the image and voila! You now have a brighter, and more favorable picture!
On to the next step.... I just created a new layer in the layer palette, then I added a little contrast around the edges. I used gaussian blur to soften the edges and then I decreased the opacity to about 38%.
After that was finished, I just have to lighten up the face a bit. I created a new layer of the picture. On the new layer, I used "lighting effects". It was really bright and it needed to be softened a bit! I changed the opacity of that layer to around 78%. Now, all you have to do is flatten the image and voila! You now have a brighter, and more favorable picture!
Notice how you can see her face a lot better? The burned edges adds a beautiful contrast to her face!

I love this picture! So pretty! Her face is so pretty and I wanted to enhance that. I brought the face into the light so you could see it a little better.


3 comments:
Love the edits! You don't need to take Kylie to a prof photographer anymore... you're practically one!
These are awesome!!! Are you using regular photoshop???
Wow, thanks for explaining your edits! I don't use Photoshop. I use PhotoImpact, but I think I understand what you did and can replicate it some. Thanks so much. Patty
Post a Comment